Introduction
What is Raptor?
Raptor is an open-source tool that enables data scientists and ML engineers to build and deploy operational models and ML-driven functionality, without learning backend engineering.
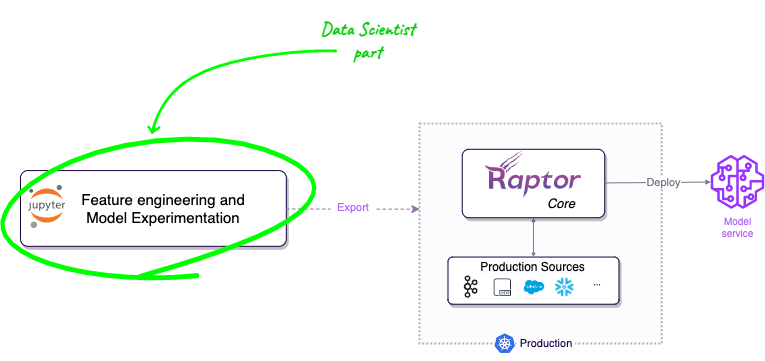
With Raptor, you can export your Python research code as standard production artifacts, and deploy them to Kubernetes. Once you deployed, Raptor optimize data processing and feature calculation for production, deploy models to Sagemaker or Docker containers, connect to your production data sources, scaling, high availability, caching, monitoring, and all other backend concerns.
What does it solve?
Without Raptor, data scientists and ML engineers have to learn backend engineering and to build the "production-version" of their work: connect the data sources, transform the data with Flink/Spark or even Java, write the deployment code, dockerize the model, handle the scaling, and so on.
This is a lot of work, and it's not the core value of the data scientist or ML engineer - so many models are not being deployed to be part of the product, or are waiting upon backend engineers to be built.
Raptor changes the game.

With Raptor, you can export your Python research code as standard production artifacts, that follows the market's best practices, and ship to production. Raptor will take care of the rest.
It let you unleash your creativity, and focus on your real work - building models and ML-driven functionality in real products.
Ready to dive in?
Jump right in, and build your first Proof-of-Concept in less than 5 minutes:
How does it work?
Raptor lets you develop your features and models in Python, and export them to production. After you export your work, Raptor will take care of the rest - it will optimize your code for production, connect to your production data sources, build and run your production data pipelines, deploy your models to Model Servers, scale, monitor, and so on.
We call this process "exporting to production", and it's the core of Raptor.

To achieve this, you need to write your code in "the Raptor way", and use Raptor's decorators to mark your complex parts. This allows us to translate it later on, and to optimize it for production.
To learn more how does Raotor work, and how to write your code in "the Raptor way", read the "How does Raptor work?" section and the "Concepts" section.
Quick Example
The following example shows you a relatively simple example that's for the sake of demonstration. It's not a real-world example, but it will give you a good idea of how your work will look like.
First, install the LabSDK:
pip install --upgrade raptor-labsdk
Then, create a new file called hello_world.py, or open your Notebook and write the following code:
import pandas as pd
from raptor import *
from typing_extensions import TypedDict


@data_source(
  training_data=pd.read_csv(
    'https://gist.githubusercontent.com/AlmogBaku/8be77c2236836177b8e54fa8217411f2/raw/hello_world_transactions.csv'),
  production_config=StreamingConfig()
)
class BankTransaction(TypedDict):
  customer_id: str
  amount: float
  timestamp: str


# Define features 🧪
@feature(keys='customer_id', data_source=BankTransaction)
@aggregation(function=AggregationFunction.Sum, over='10h', granularity='1h')
def total_spend(this_row: BankTransaction, ctx: Context) -> float:
  """total spend by a customer in the last hour"""
  return this_row['amount']


@feature(keys='customer_id', data_source=BankTransaction)
@freshness(max_age='5h', max_stale='1d')
def amount(this_row: BankTransaction, ctx: Context) -> float:
  """total spend by a customer in the last hour"""
  return this_row['amount']


# Train the model 🤓
@model(
  keys='customer_id',
  input_features=['total_spend+sum'],
  input_labels=[amount],
  model_framework='sklearn',
  model_server='sagemaker-ack',
)
@freshness(max_age='1h', max_stale='100h')
def amount_prediction(ctx: TrainingContext):
  from sklearn.linear_model import LinearRegression
  df = ctx.features_and_labels()
  trainer = LinearRegression()
  trainer.fit(df[ctx.input_features], df[ctx.input_labels])
  return trainer


amount_prediction.export()  # Export to production 🎉
That's it! You can now run the code, and it will export your work as production artifacts.
You can deliver these artifacts to your backend or devops engineers, and they can deploy them to production using
standard tools such as kubectl or instruct them to plug in their CI/CD pipeline using the generated Makefile.
What's next?
To learn more about the full potential of Raptor, check out the core concepts section or dig into the expanded Getting Started guide.